Alright, one of the most important parts of a website, forms. If you want your form to be beautiful and practical at the same damn time, here’s a complete guide on fully editing Contact Form 7 – Design customization, conditional fields, two columns, countries, auto-responders & more.
Content table:
- About Contact Form 7 – Elements, usage
- Design customizations
- Usages
- Conditional fields
- Redirect to a thank you page after successful Contact Form 7 submission
- Contact Form 7 CRM
- Add a countries select widget to Contact Form 7
- Set up form completion notifications
- Set up auto-responders
- Best Contact Form 7 addons, plugins
- Contact Form 7 alternatives
1. About Contact Form 7 – Elements, usage:
The most used plug in for forms, I don’t really know the reason, as it is very simple, lacks user friendliness and doesn’t have design capabilities without coding. But it is what it is, we have CF7, and to be honest after getting the hang of it, you don’t want to use another plug in for forms.
Contact Form 7 Elements
| Name | Explanation | CSS class |
|---|---|---|
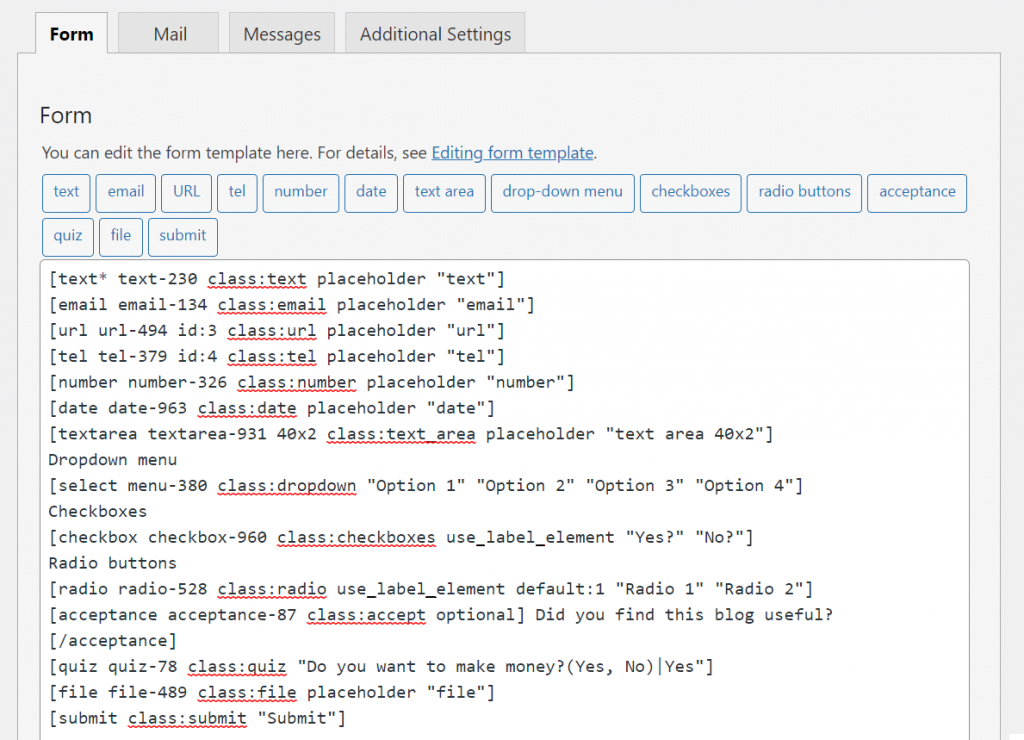
| text | The user enters a text, can be used for names, last names, company names, etc… | form input.text |
| Used for emails, obviously | form input.email | |
| URL | Used to capture websites, verifies whether the input is a website or not | form input.url |
| tel | Used to capture phone numbers | form input.tel |
| number | Used to enter numbers, can be used for age, income amount, website visitors count, etc… | form input.number |
| date | A date picker, where the user can pick a date | form input.date |
| text area | Used to allow visitors to enter a message, usually long | form textarea |
| drop-down menu | A drop down menu where the user can choose one of the pre-defined options | form select, form select option |
| checkboxes | Check box list, where the user can check/uncheck one or multiple pre-defined options | span.wpcf7-form-control.wpcf7-checkbox |
| radio buttons | Radio buttons, where the user can select one pre-defined option | span.wpcf7-form-control.wpcf7-radio |
| acceptance | Checkbox, usually used for accepting terms & conditions, receiving promotional emails, upsells, etc… | span.wpcf7-form-control.wpcf7-acceptance |
| quiz | Used to verify users or just for fun quizzes | input.wpcf7-form-control.wpcf7-quiz |
| file | An attachment place, where the user attaches a file | form .file |
| submit | Submit button, used to allow the user to submit the filled form | input.wpcf7-form-control.wpcf7-submit |
In case you want to change all input types, here’s the class: form input:read-write, form textarea, form select, form select option
form input:read-write, form textarea, form select, form select option {
	color: #fff;
	border-radius: 25px;
	background-color: #000;
	width:100%;
}
2. Fully customize your Contact Form 7 design
Customizing Your Contact Form 7 forms, is really easy, but needs a bit coding. I’ve organized it into sections.
1. General changes
Form styling such as, button, font family, size, color are inherited from theme options… In case you want your form to have a different style, here’s the way to do it:
Change the CF7 button styling, obviously change every metric as you wish:
input.wpcf7-form-control.wpcf7-submit {
background-color: #fff;
border: solid 5px #000;
border-radius: 0;
color: #000;
font-weight: 500;
}
2. Making Contact Form 7 form elements 2 columns
In order to make any two fields in two columns you have to do two things.
- Firstly, create the class. Secondly, copy and paste the below code in your Additional CSS… Go to Appearance -> Customize -> Additional CSS
/* CF7 Inline columns */
.cf7column {
  float: left;
  width: 50%;
}

/* Clear floats after the columns */
.cf7row:after {
  content: "";
  display: table;
  clear: both;
}
2. Firstly, add the class to the form fields. Secondly, in the contact form editor, add the classes to the fields you want to have in 2 columns. Contact -> choose to edit your form
<div class="cf7row">
  <div class="cf7column">[email* your-email placeholder "Your Email"]</div>
  <div class="cf7column">[submit "Submit"]</div>
</div>
3. Edit only specific form
If you don’t want your styles and edits to take effect on all the forms on your website, all you have to do is make the changes to the specific form by adding its id.
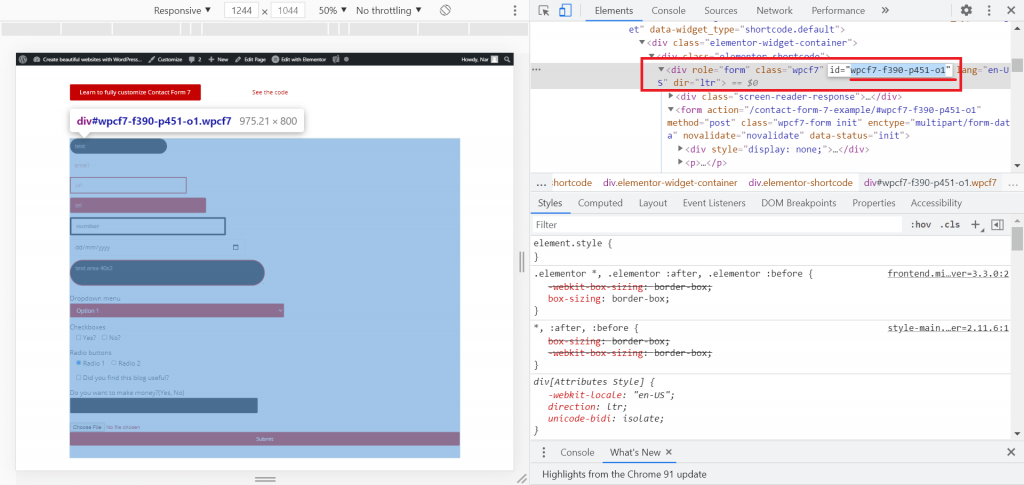
You can find the id in the inspect element of the specific form.
Go to your website -> right click on the form you want to edit -> click on “Inspect” -> You can find the form id in the CSS code just like in the screenshot -> id=”wpcf7-f77-p7-o1”
To target a specific form go to your wp dashboard, after that, Appearance -> Customize -> Additional CSS ->
#[form id] [element class] {CUSTOM_STYLING}
4. Edit each & every field possible
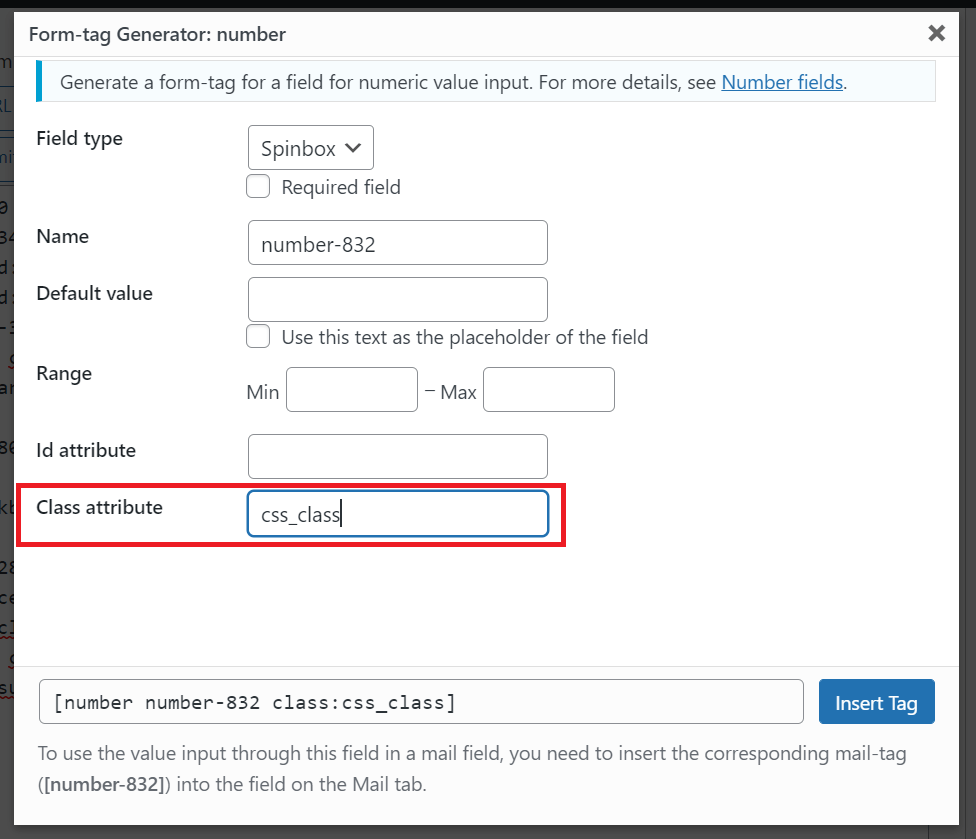
Alright, first you will have to add a “Class attribute” to each and every field.
You can edit each element by targeting the specific class attribute you added in the additional css. Go to wp dashboard. After that, Appearance -> Customize -> Additional CSS
.wpcf7 .css_classHere you can see a fully customized Contact Form 7 and its customization code.
5. Change Contact Form 7 placeholders’ colors and styles
In order to change Contact Form 7 placeholder colors, you have to also change the opacity, as changing the color alone is not enough. And you have to do so for every browser. Here’s the code, change the colors with whatever you want.
You can also do this for only specific forms, by adding the form ID, #[form-id] and the code instead of .wpcf7.
.wpcf7 ::-webkit-input-placeholder { /* WebKit browsers */
color: #ffffff; !important;
opacity: 1;
}
.wpcf7 :-moz-placeholder { /* Mozilla Firefox 4 to 18 */
color: #ffffff; !important;
opacity: 1;
}
.wpcf7 ::-moz-placeholder { /* Mozilla Firefox 19+ */
color: #ffffff; !important;
opacity: 1;
}
.wpcf7 :-ms-input-placeholder { /* Internet Explorer 10+ */
color: #ffffff; !important;
opacity: 1;
}
.wpcf7 form input:read-write, form textarea {
	color:#fff;
	font-family: "Open Sans";
}
3. Contact Form 7 simple usages
1. Subscribe submission
You can use CF7 to expand your subscriptions list. For instance, just add email field and a submit button.
[email* your-email placeholder “Your Email”]
[submit “Submit”]
2. Reservations
You can use CF7 to accept reservations. Here’s an example:
[text* your-name placeholder “Name*”]
[tel* tel-428 placeholder “Phone number*”]
[date* date-259 placeholder “Reservation date*”]
[number* number-722 placeholder “Number of people*”]
[textarea your-message 40×2 placeholder “Reservation details”]
[submit “Make your reservation now”]
4. Conditional fields for Contact Form 7
Conditional fields are the fields which are shown or hidden based on certain input values of other fields.
Let’s say your form can only be submitted by people who are 18+… So when the visitors inputs 17 the submit button disappears.
To use conditional fields, use the following plug in.
Tips & tricks for using the Contact Form 7 – Conditional Fields free plug in
- You can make any element appear by default, by adding a “show” rule with an empty value. Let’s say you want the submit button to disappear when the age is less than 18. So you have to create show rules on the submit button on all the possible ages above 18. But in this case the button won’t appear when the form is still empty, so you add a new rule to show the button when the age value is empty. Tataam…
- You can easily copy paste conditional fields by changing the edit mode to “Text mode”, and copy paste the code to another form

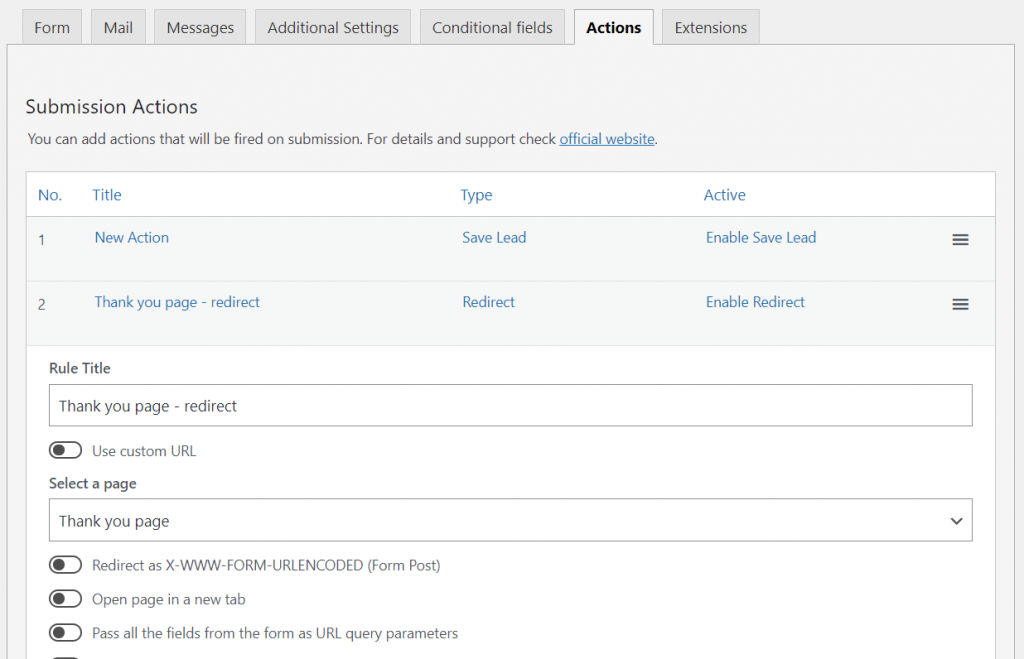
5. Redirect after successful form submission
There are two ways to redirect a user after a successful Contact Form 7 submission.
- The easy way
Add this code to your child’s theme functions.php or via Snippet plug in. However, change the http://yourwebsite.com/thank-you-page with where you want to redirect…
<script>
document.addEventListener( 'wpcf7mailsent', function( event ) {
  location = 'http://yourwebsite.com/thank-you-page';
}, false );
</script>
- The easier way
Install the Redirection for Contact Form 7 plug in, after that, go to the form -> Actions -> add the redirect.
6. Save Contact Form 7 submitted contacts
1. Save contacts directly in WordPress admin
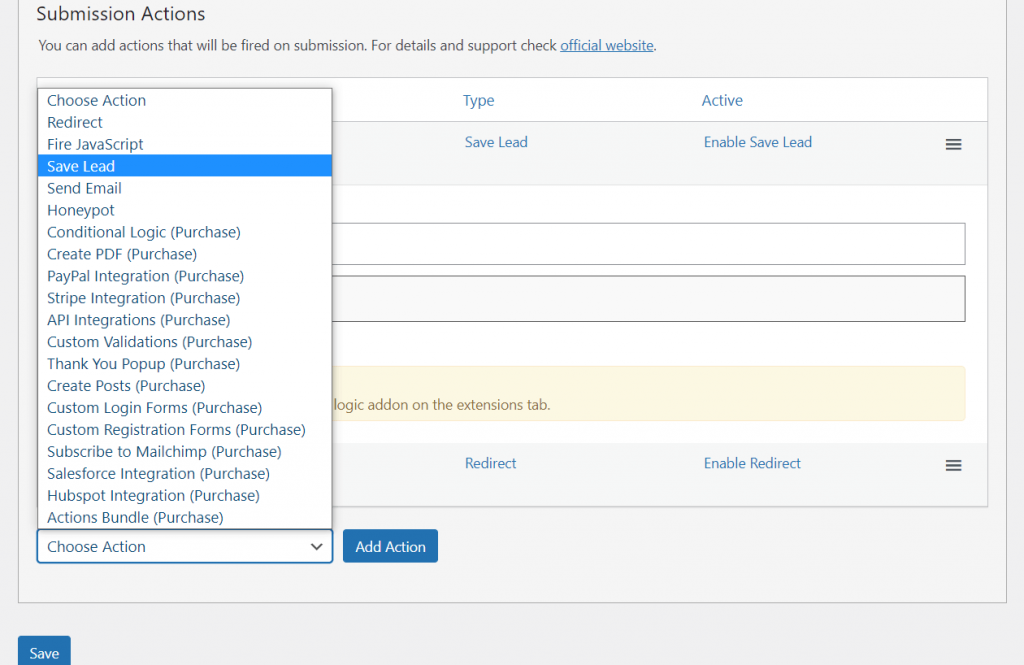
Install the Redirection for Contact Form 7 plug in -> add a new action “Save leads”
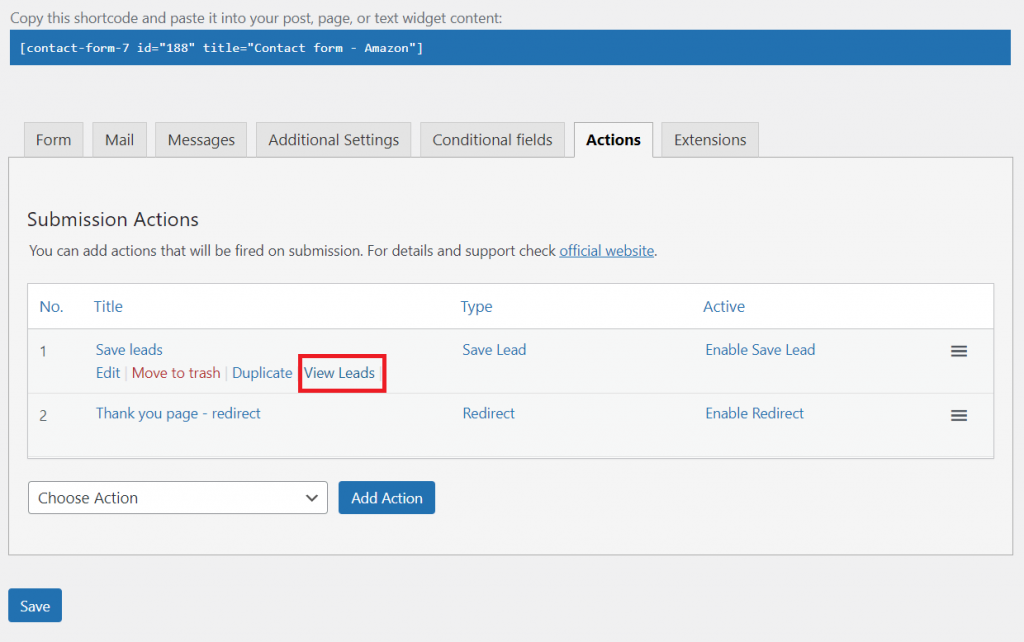
You can view the leads by going to actions -> find the save leads action -> View leads
2. Integrate Contact Form 7 to a CRM
You can integrate Contact Form 7 to a custom CRM with API integrations, or:
Integrate Contact Form 7 with MailChimp
Integrate Contact Form 7 with HubSpot
Integrate Contact Form 7 with Salesforce
Integrate Contact Form 7 with Zoho
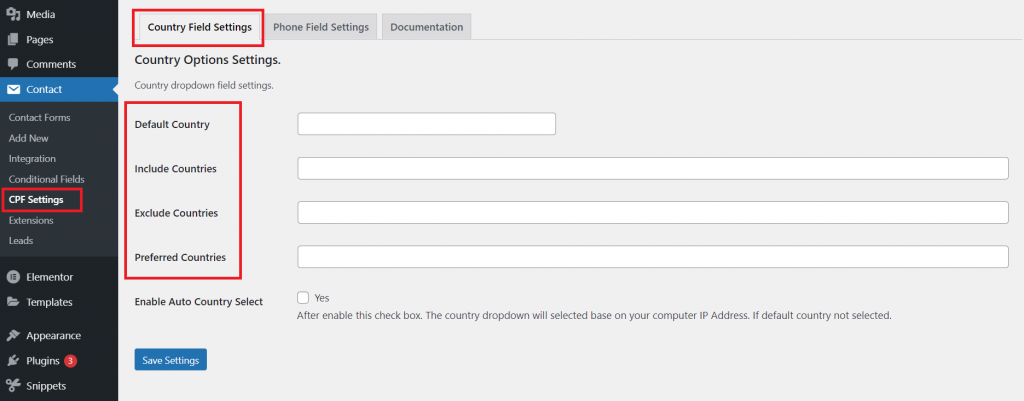
7. Add a countries select widget to Contact Form 7
To add a country select widget, install the Country & Phone Field Contact Form 7

8. Set up Contact Form 7 form completion notifications & emails
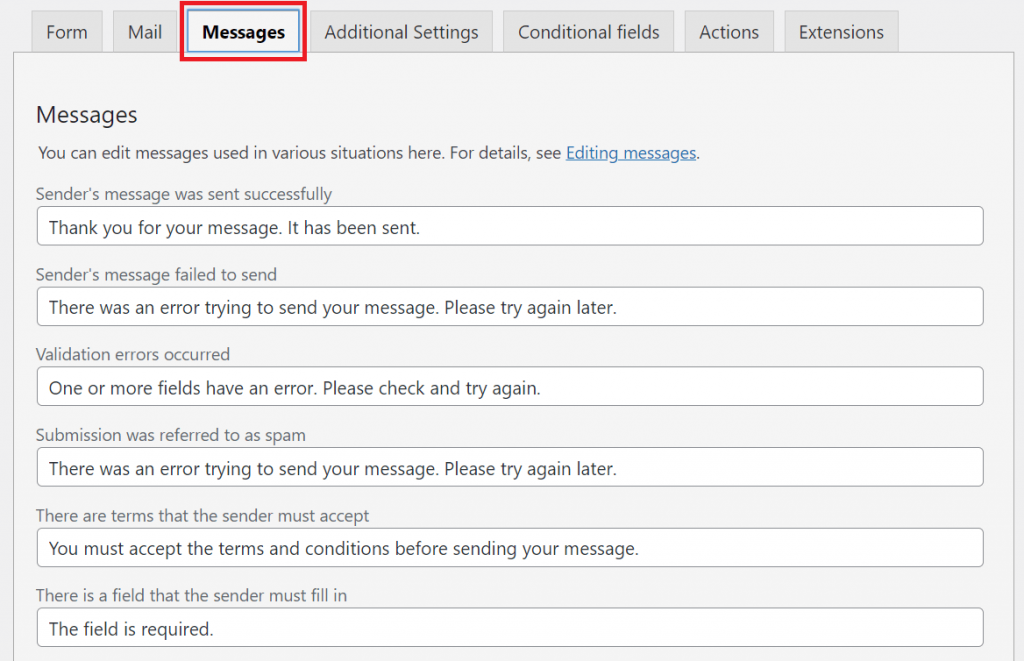
Edit Form submission messages from each Contact Form 7 form -> Messages
MAKE SURE YOU ADD THE FORM FIELDS IN THE RECEIVING EMAIL
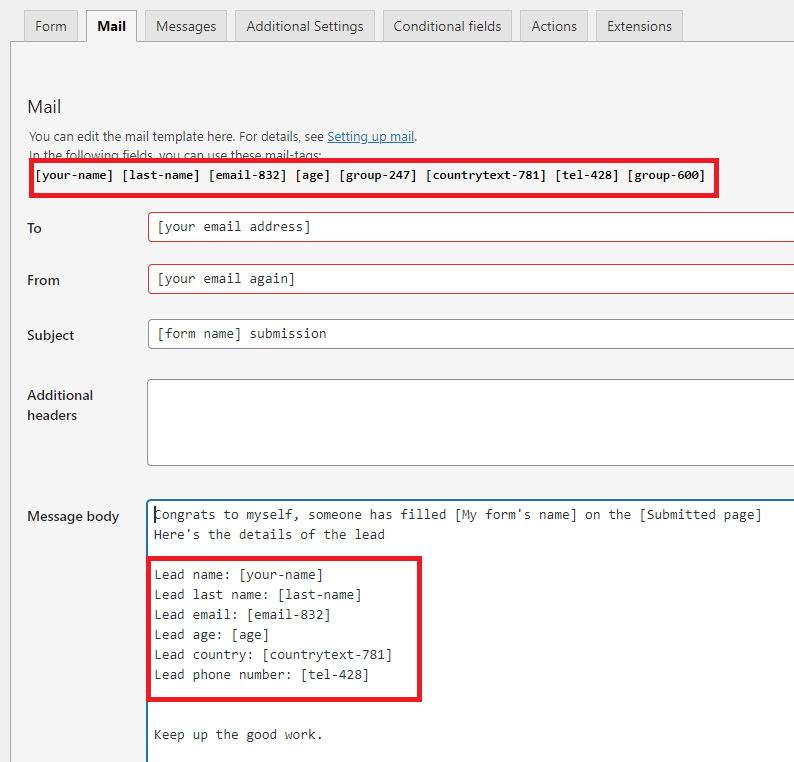
Go to your specific form -> Mail
The first mail message is set up to notify you that a form was submitted, in other words, to inform you about the details of the form.
Your form fields are variables. Their value changes based on the filled value by the visitor. You can find the variable ids at the top of the Mail tab (highlighted in the red square [your-name], [last-name]….)
So in order for you to find out what the leads have actually filled, you need to enter these values in the message body, highlighted in the 2nd red square, in the Message body section.
Note: The variables will be different for you based on your form fields, therefore use the variables that you have.
Note: This email is for you, so you write whatever 😀 motivate yourself.
If you’re asking visitors to upload a document or attach a file you have to add the attachment variable in the File attachment section in the Mail tab.

9. Set up Contact Form 7 auto-responders
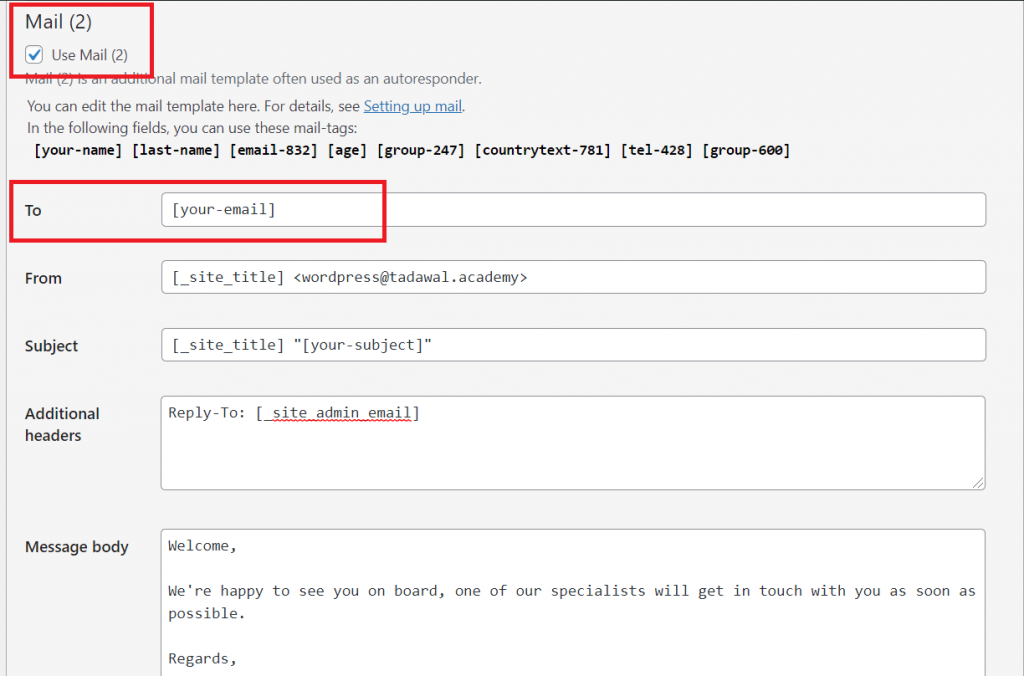
To set up an auto-responder you need to go to the form -> Mail -> scroll down to Mail (2) -> Check it
Make sure you add the to field the email variable for the form, so that the email goes to the lead (since the lead has filled his/her email in the field)
10. Best Contact Form 7 addons, plugins
Here’s a shortlist of the best Contact Form 7 addons and plug-ins, which will improve its work and add more practical functionalities to it.
- Contact Form 7 Conditional Fields
- Country & Phone Field Contact Form 7
- Redirection for Contact Form 7
- Moana Contact Form 7 Builder Premium Plugin
- Contact Form 7 Multistep Forms
- Contact Form 7 reCaptcha v2 Free Add-on
- WP Contact Slider Free
11. Best Contact Form 7 alternatives
In case you don’t want to use Contact Form 7, here are some of the better alternatives. Although, once you get used to CF7 it becomes good. But here are some:

